NodeMCU-DHT11-ThingSpeak

In this tutorial, we will learn how to monitor humidity and temperature using the DHT11 sensor and NodeMCU ESP8266, and then upload the readings to the ThingSpeak cloud server. The DHT11 will measure temperature and humidity, while ThingSpeak will serve as our IoT cloud platform to store, visualize, and analyze the sensor data from anywhere in the world.
DHT11 Humidity & Temperature Sensor:
The DHT11 is a simple, ultra–low-cost digital sensor used for measuring temperature and humidity. It combines a capacitive humidity sensor and an NTC thermistor to sense the environmental moisture and temperature. The Sensor provides a calibrated digital output on its single data pin, so no analog input is required—making it ideal for microcontrollers like the NodeMCU ESP8266, Arduino, and ESP32.

The DHT11 communicates using a single-wire protocol, and while it is easy to interface, the data communication requires precise timing. Fortunately, there are well-supported Arduino libraries that handle all timing requirements, making it very beginner-friendly.
Although the DHT11 is widely used in DIY and IoT projects, it does come with a few limitations. The most notable is its slow sampling rate — it can only provide a new reading once every 2 seconds. This means that when you request data, the values may be up to 2 seconds old. Additionally, its measurement range and accuracy are modest compared to other sensors like the DHT22.
DHT11 Specifications:
| Parameter | Value |
|---|---|
| Humidity Range | 20% to 90% RH |
| Humidity Accuracy | ±5% RH |
| Temperature Range | 0°C to 50°C |
| Temperature Accuracy | ±2°C |
| Sampling Rate | 1 reading every 1–2 seconds |
| Operating Voltage | 3.3V to 5V |
| Interface | Single-Wire Digital |
Key Features:
- Single-wire digital output (no analog pin needed)
- Low-cost and easy to interface
- Calibrated output — no complex calculations required
- Compatible with 3.3V and 5V controllers
- Compact and reliable for basic environmental monitoring
Circuit Diagram & Connection:
To interface the DHT11 temperature and humidity sensor with the NodeMCU ESP8266, we only need three active pins: VCC, Data, and GND. The DHT11 communicates using a single-wire digital interface, which makes the wiring very simple.

In the circuit shown above, the DATA OUT pin of the DHT11 is connected to GPIO0 (D3) of the NodeMCU, and the Sensor is powered through the NodeMCU’s 3.3V supply. Since the ESP8266 GPIO pins work at 3.3V logic, the DHT11 is fully compatible and does not require any level shifting.
Setting Thingspeak & Getting API Key:
To store and visualize your sensor data on the cloud, we will be using ThingSpeak, a popular IoT analytics platform. Follow the steps below to create your channel and get the required API Key.

- Create a ThingSpeak Account
Visit https://thingspeak.com/ and sign in. If you are a new user, create a free account by completing a simple registration process. Once your account is activated, log in to your dashboard. - Create a New Channel
After logging in, click on “New Channel” from the dashboard.- Enter a Channel Name (e.g., Humidity & Temperature Monitoring)
- Enable at least two fields:
- Field 1 → Temperature
- Field 2 → Humidity
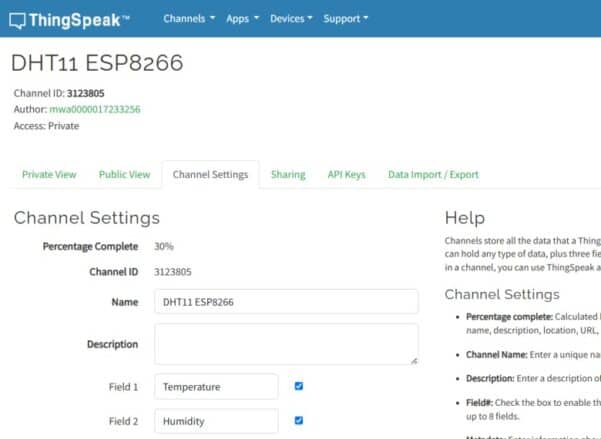
- Add an optional description and metadata if needed
Scroll down and click “Save Channel” to create it successfully.
- Get the API Key
Once your channel is created, navigate to the “API Keys” tab.
Here you will find two keys:- Write API Key – used for uploading data from NodeMCU
- Read API Key – used for reading/displaying data
Copy the Write API Key and save it in Notepad — you will need this key later in the Arduino code to send your DHT11 data to ThingSpeak.
Source Code/Program:
The complete program for monitoring Humidity and Temperature using the DHT11 sensor and NodeMCU on ThingSpeak is provided below. Follow the steps to upload it through the Arduino IDE:
- Copy and paste the code into your Arduino IDE.
- Download and install the DHT11/DHT22 library from GitHub (or through Arduino Library Manager) and ensure it is added to your project.
- Select the correct board by navigating to:
Tools → Board → NodeMCU 1.0 (ESP-12E Module). - Insert your ThingSpeak Write API Key into the code at the specified location. This is the same key you generated while creating your channel.
- Edit the Wi-Fi credentials, replacing the default SSID and Password with your own network details.
- Verify (Compile) the code and then upload it to the NodeMCU board.
1 2 3 4 5 6 7 8 9 10 11 12 13 14 15 16 17 18 19 20 21 22 23 24 25 26 27 28 29 30 31 32 33 34 35 36 37 38 39 40 41 42 43 44 45 46 47 48 49 50 51 52 53 54 55 56 57 58 59 60 61 62 63 64 65 66 67 68 69 70 71 72 73 74 75 76 77 78 79 80 81 82 83 84 85 86 87 88 89 90 91 92 93 94 95 96 97 98 99 100 101 102 103 104 105 106 107 108 109 110 111 112 113 114 115 116 117 118 119 120 | /* NodeMCU (ESP8266) + DHT11 → ThingSpeak ————————————– – Reads temperature & humidity from DHT11 – Posts data to ThingSpeak Channel fields – Uses a safe 20 s upload interval (ThingSpeak min = 15 s; DHT11 ~2 s) Wiring (NodeMCU 1.0 ESP-12E): DHT11 VCC -> 3V3 DHT11 DATA -> D3 (GPIO0) // you can change the pin if you prefer DHT11 GND -> GND (Most DHT11 modules already have a 10k pull-up on DATA) */ #include <ESP8266WiFi.h> #include <DHT.h> // ——————– USER SETTINGS ——————– const char* ssid = “how2electronics”; // <– replace with your WiFi SSID const char* password = “alhabibi”; // <– replace with your WiFi password // ThingSpeak settings const char* server = “api.thingspeak.com”; const char* writeAPI = “H38TEGNC0XKW43BB”; // <– replace with your ThingSpeak WRITE API key // Map your fields in the channel: Field1 = Temperature (°C), Field2 = Humidity (%RH) //Sensor settings #define DHTPIN 0 // GPIO0 (NodeMCU pin label: D3) #define DHTTYPE DHT11 // —————————————————— DHT dht(DHTPIN, DHTTYPE); WiFiClient client; // Upload every ≥15 s. Use 20 s for safety. const unsigned long UPLOAD_INTERVAL_MS = 20000; unsigned long lastUpload = 0; void connectWiFi() { Serial.print(“Connecting to WiFi: “); Serial.println(ssid); WiFi.mode(WIFI_STA); WiFi.begin(ssid, password); // Wait for connection uint8_t tries = 0; while (WiFi.status() != WL_CONNECTED) { delay(500); Serial.print(‘.’); if (++tries >= 60) { // ~30 seconds timeout Serial.println(“\nWiFi connect timeout. Restarting…”); ESP.restart(); } } Serial.println(“\nWiFi connected!”); Serial.print(“IP address: “); Serial.println(WiFi.localIP()); } void setup() { Serial.begin(115200); delay(50); Serial.println(); Serial.println(“DHT11 + NodeMCU → ThingSpeak”); dht.begin(); connectWiFi(); } bool postToThingSpeak(float temperatureC, float humidity) { // Build URL-encoded POST body. API key can go in header (X-THINGSPEAKAPIKEY) // or as field “api_key” in the body. We’ll send it in the header and keep // the body to fields only. String postBody = “field1=” + String(temperatureC, 1) + “&field2=” + String(humidity, 1); if (!client.connect(server, 80)) { Serial.println(“Connection to ThingSpeak failed.”); return false; } // HTTP request client.print(String(“POST /update HTTP/1.1\r\n”) + “Host: “ + String(server) + “\r\n” + “Connection: close\r\n” + “X-THINGSPEAKAPIKEY: “ + String(writeAPI) + “\r\n” + “Content-Type: application/x-www-form-urlencoded\r\n” + “Content-Length: “ + String(postBody.length()) + “\r\n\r\n” + postBody + “\r\n”); // Read response (optional but useful for debugging) unsigned long start = millis(); while (client.connected() && millis() – start < 3000) { while (client.available()) { String line = client.readStringUntil(‘\n’); // Uncomment to see entire response: // Serial.println(line); // ThingSpeak returns an integer line with the entry number if successful if (line.length() == 1 && line[0] == ‘\r’) { // blank line before body String body = client.readString(); Serial.print(“ThingSpeak response (entry ID or 0): “); Serial.println(body); break; } } } client.stop(); return true; } void loop() { // Respect ThingSpeak & DHT11 timing if (millis() – lastUpload < UPLOAD_INTERVAL_MS) { delay(50); return; } // Read Sensor float h = dht.readHumidity(); float t = dht.readTemperature(); // Celsius if (isnan(h) || isnan(t)) { Serial.println(“Failed to read from DHT11. Retrying next cycle…”); lastUpload = millis(); // still wait until next interval return; } Serial.print(“Temperature: “); Serial.print(t, 1); Serial.print(” °C, Humidity: “); Serial.print(h, 1); Serial.println(” %RH”); // Upload to ThingSpeak if (postToThingSpeak(t, h)) { Serial.println(“Update sent to ThingSpeak.”); } else { Serial.println(“Update failed.”); } lastUpload = millis(); } |
Once the upload is complete and your NodeMCU is powered on, it will automatically connect to Wi-Fi and begin sending DHT11 sensor data to your ThingSpeak channel.
Monitor Humidity and Temperature Data on ThingSpeak
Once powered, the DHT11 continuously measures humidity and temperature from the surrounding air. The NodeMCU requests the sensor data through the DATA pin, and then sends the collected values to the ThingSpeak cloud via Wi-Fi.
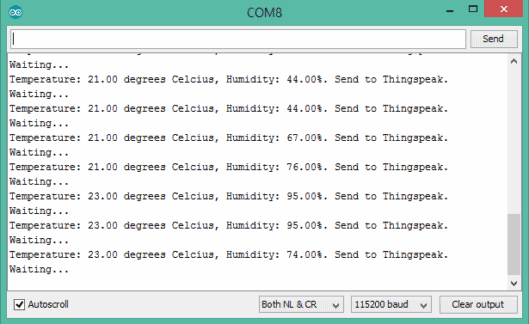
To monitor your sensor readings on ThingSpeak, open your channel and navigate to the “Private View” section. The temperature and humidity data will be displayed as real-time graphs, updating each time your NodeMCU uploads new values.
